Avatar Wrap
Avatar Wrap Documentation
For installation instructions and documentation for the other Avatar Creator tools, open the main documentation page .
For the cleanest workflow, use Avatar Wrap in an empty Blender file.
Avatar Wrap reshapes a base mesh so that it matches the form of another mesh. The Base is the mesh whose topology you want to keep. The Target is the scan, sculpt, generated character, or external mesh whose shape you want to capture.
Avatar Wrap is organized into four main sections :
- Choose — select the Base workflow, starting preset or custom setup, and the Target mesh whose form you want to capture.
- Avatar Wrap Workflow — place landmarks, run the wrap, refine local problem areas where needed, review the result, and accept the final output.
- Transfer to AVC — send an accepted wrapped shape to a compatible Avatar Creator character with one click.
- Texture Transfer — transfer texture maps from the original Target to the wrapped mesh and export the generated images.
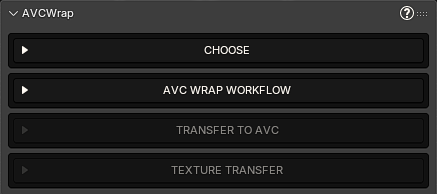
The normal order is: choose the Base , choose the Target , place landmarks , run the wrap , refine the result where needed , and accept the output . Afterward, use Transfer to AVC , Texture Transfer , or both when needed.
Current workflow: Avatar Wrap includes all three Base modes shown below: AVC Preset, MetaHuman, and Custom Mesh. Custom Mesh is part of the current Avatar Wrap release and uses the same Avatar Wrap license.
1. Choose the Base
Open Choose and use the Base menu to choose among AVC Preset , MetaHuman , and Custom Mesh .
Option A — AVC Preset
Use this option when the wrapped result should keep the standard AVC topology and be ready for the Avatar Creator workflow.
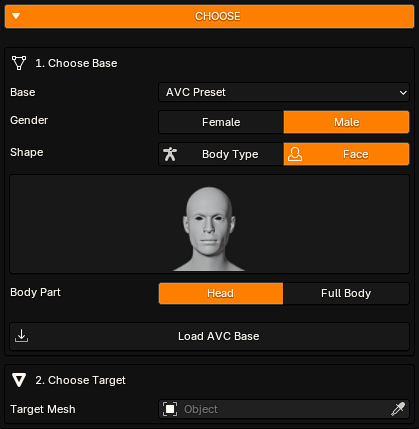
- Gender selects the Female or Male AVC base.
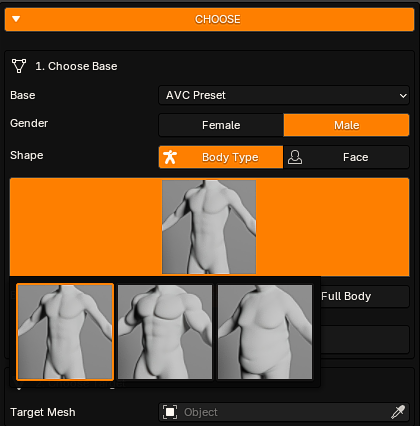
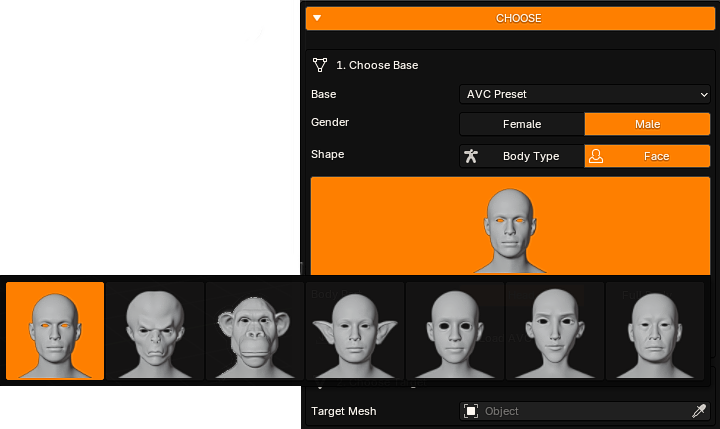
- Shape switches between the Body Type and Face preset libraries.
- Preset selects the starting shape shown in the thumbnail browser. Choose the closest available preset to the target.
- Body Part is intentionally simplified in AVC Preset mode to two choices: Head and Full Body.
- Load AVC Base adds the selected base to the scene.
In AVC Preset mode, choose Head when you only need to reshape the head and upper neck, or Full Body when the complete AVC character must follow the target. These two direct choices replace the previous long Body Part drop-down and make the standard AVC workflow faster to configure.
Selecting Body Type or Face opens the corresponding preset browser. Choose the closest starting shape before loading the Base.
Option B — MetaHuman
Use this dedicated option when the Base is an Unreal Engine MetaHuman and the wrapped result must preserve the MetaHuman topology and its separate character structure.
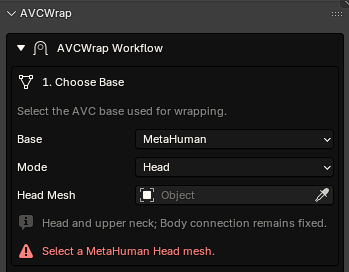
Select MetaHuman from the Base menu, choose the required Mode , and assign the mesh fields displayed by the panel.
- Head — assign the MetaHuman head in Head Mesh . The head and upper neck are wrapped while the body connection remains fixed.
- Full Body — assign the MetaHuman head and body meshes requested by the panel so Avatar Wrap can process them as one coordinated character workflow while preserving their original topology.
Use the head and body meshes from the same MetaHuman character and keep their transforms aligned. Do not manually join or retopologize them before setup. When the related MetaHuman eye and teeth objects are present, finalization keeps their topology unchanged and repositions them to follow the accepted wrapped identity.
Option C — Custom Mesh
Custom Mesh lets you use virtually any character mesh as the Base while preserving that mesh's own topology. Use this mode for meshes such as Genesis 9 , Character Creator characters, proprietary studio base meshes, the Blender Foundation's open human base mesh, or another character topology that is not covered by a native Avatar Wrap setup.
Custom Mesh is included in the current Avatar Wrap release. It can be used as a standalone wrapping workflow: Avatar Creator is not required when you want to wrap and keep the topology of your own Base mesh. Custom Mesh uses the same Avatar Wrap product and license as the other Base workflows.
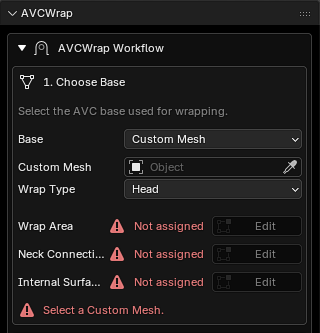
Custom Mesh must be prepared before you place landmarks or run the wrap. AVC Preset and MetaHuman use pre-configured, topology-aware setups, so Avatar Wrap already knows the regions needed by the solver. An arbitrary Custom Mesh has no predefined structure. Before wrapping, you must manually tell Avatar Wrap which geometry may deform, where the wrapped region connects to the geometry that must remain unchanged, and which vertices belong to internal cavities.
If this is your first Custom Mesh setup, watch the short Custom Mesh preparation workflow before continuing. The video shows the complete setup on a Genesis 9 base mesh, including the Wrap Area, connection area, and Internal Surfaces assignments.
First select the object in Custom Mesh , then choose the required Wrap Type . Custom Mesh supports granular regions including Face, Head, Torso, Arms, Arm L, Arm R, Legs, Leg L, Leg R, Body (No Head), and Full Body. Avatar Wrap displays the assignments required for the selected type.
Custom Mesh preparation has three key steps:
- 1. Wrap Area — select every vertex that is allowed to follow the Target shape. For a Head wrap, this is the head and the portion of the neck that you want to reshape. For other Wrap Types, select the complete region that should be deformed.
- 2. Connection Area — define the boundary between the geometry that will be wrapped and the geometry that must remain unchanged. For a Head wrap, this control is shown as Neck Connection. This boundary gives Avatar Wrap a controlled transition where the new wrapped region reconnects to the untouched mesh.
- 3. Internal Surfaces (Mouth & Eyes) — select the geometry that turns inward into cavities, including the inner mouth, inner eyelids, eye sockets, and any similar concave internal surfaces. This assignment is required for Face, Head, and Full Body workflows whenever those internal regions are present.
Internal Surfaces are critical. Many character meshes contain concave geometry that extends inward around the eyes and inside the mouth. If those vertices are not identified correctly, the solver can treat them as part of the normal external surface and project them outward toward the Target. This can pull internal geometry through the face, collapse the eye or mouth cavities, and break the wrap. Assigning these vertices as Internal Surfaces tells Avatar Wrap that they belong to internal cavities and must not be treated as ordinary exterior projection geometry.
To assign any required area, click Edit . Avatar Wrap activates the Custom Mesh and enters Edit Mode. Select the required vertices, then click Assign Vertices . Use Cancel to leave the editing session without replacing the current assignment. A vertex count and checkmark confirm a completed area.
When defining Internal Surfaces, inspect the eyes and mouth from multiple angles and in depth. Select the complete inward-facing cavity, not only the visible rim. The goal is to separate internal geometry from the outer surface that should actually conform to the Target.
You do not need to create a separate Smooth area. Avatar Wrap prepares the transition between the wrapped and unchanged regions automatically.
Complete all assignments requested for the selected Wrap Type before continuing to the Target and landmark stages. Once these regions are defined correctly, the Custom Mesh can be used as the Base for the normal Avatar Wrap workflow while keeping its original topology.
2. Choose the Target
In Choose Target , assign the external mesh whose form you want to capture in the Target Mesh field. This can be a scan, sculpt, generated character, or another character mesh.
Before placing landmarks, make sure the Base and Target are visible, face the same direction, and have a reasonably similar position and scale. In AVC Preset mode, choose the closest available AVC starting preset before placing landmarks.
3. Place Landmarks
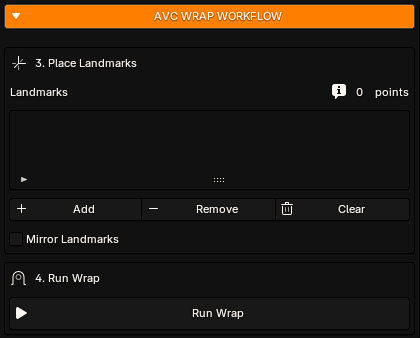
Landmarks tell Avatar Wrap which points on the Base correspond to points on the Target.
- Click Add to enter Landmark Mode.
- Click a point on the Base in the left viewport.
- Click the matching point on the Target in the right viewport.
- Repeat the pair for the main features and the limits of the area being wrapped.
- Press Esc or the right mouse button to leave Landmark Mode.
- Remove deletes the selected landmark pair.
- Clear removes all landmark pairs.
- Mirror Landmarks mirrors each new landmark pair added after the option is enabled. It does not rebuild or modify landmark pairs that were already placed. The control is automatically disabled for one-sided Arm L, Arm R, Leg L, and Leg R wraps; leave it off whenever the geometry or landmark layout is intentionally asymmetric.
Distribute landmarks across the complete wrap area instead of concentrating them in one small region. The point counter shows how many completed pairs are available.
4. Run Wrap
Click Run Wrap after the Base, Target, required Custom Mesh areas, and landmarks are ready. If the button is disabled, return to the earlier sections and resolve the warning shown in the panel.
- Run Wrap generates the wrapped result and opens the Refine Wrap review stage.
- Re-Run Wrap regenerates the result after you change landmarks or other wrap settings.
Inspect the wrapped mesh from several angles. If the overall fit requires another solver pass, adjust the setup and run the wrap again. If only local areas need correction, continue to Refine Wrap .
5. Refine Wrap
After the solver finishes, Refine Wrap lets you correct local fitting defects before finalization while preserving the Base mesh topology. Use the brushes only where the wrapped result needs manual adjustment.
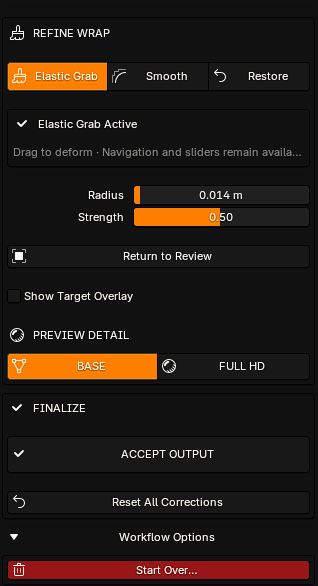
Topology-aware brushes
- Elastic Grab — drag the surface to reposition difficult local forms, such as unusual ear shapes or facial features that were not captured completely by the solver.
- Smooth — drag across uneven, compressed, or irregular areas to relax the local surface and improve continuity.
- Restore — apply targeted clicks or short strokes to recover local Base detail in problem areas without rebuilding or retopologizing the mesh. For small defects, individual clicks usually provide more controlled results than a continuous drag. Vertex count and vertex, edge, and face connectivity remain unchanged.
Brush controls
- Radius controls the size of the area affected by the active brush.
- Strength controls how strongly each drag, stroke, or Restore click modifies the result.
- Return to Review exits the active brush mode and keeps the corrections already applied.
Review controls
- Show Target Overlay displays the Target as an overlay on the wrapped result. Use it as a visual guide when moving or relaxing areas that need to follow the Target more closely. The overlay does not modify either mesh.
- Base displays the current wrapped and corrected result at the Base mesh's native topology and resolution.
- Full HD activates a temporary subdivided high-detail preview so smaller surface differences can be inspected more clearly. This preview does not replace the Base topology used by the correction workflow.
When the local corrections are complete, click Return to Review , inspect the result from several angles, and continue to Finalize .
6. Finalize
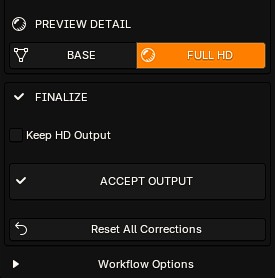
- Accept Output finalizes the current wrapped result, including any Refine Wrap corrections. Review the mesh first, because this action accepts the current output for the following workflows.
- Keep HD Output creates a separate editable Multiresolution result named AVCW_Output_HD when you accept the output. The Base remains the official accepted wrap result.
- Reset All Corrections removes every Elastic Grab, Smooth, and Restore correction made after the latest wrap and returns the mesh to the exact post-wrap result. It does not discard the Base, Target, landmarks, or wrap setup.
- Start Over performs a complete wrap reset and returns Avatar Wrap to a clean starting state. It replaces the previous Full Reset action.
After Accept Output , you can keep and use the wrapped mesh directly. Accepting the output is also required before transferring the result to an Avatar Creator character.
7. Transfer to Avatar Creator
This step is optional. Use it when you want the accepted wrap result to become the shape of an Avatar Creator character.
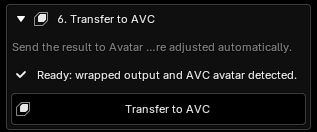
When the accepted wrapped output and a compatible AVC avatar are detected, the panel displays a ready message. Click Transfer to AVC to send the wrapped shape to the Avatar Creator character. Related face parts are adjusted automatically.
If the panel cannot detect the required objects, Manual Setup appears. Create or import an AVC avatar of the gender requested by the panel, then assign:
- Wrapped Mesh — the accepted Avatar Wrap result.
- AVC Avatar — the destination Avatar Creator Male or Female character.
The transfer button remains disabled when the output has not been accepted, an object is missing, or the avatar gender does not match the selected base.
8. Texture Transfer
Texture Transfer is optional and independent from Transfer to AVC. In this section, Source means the original textured mesh from which maps are read, while Target means the accepted or current wrapped result that receives the transferred maps. You can transfer one selected map or all supported maps that Avatar Wrap can detect on the Source material.
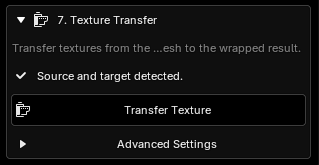
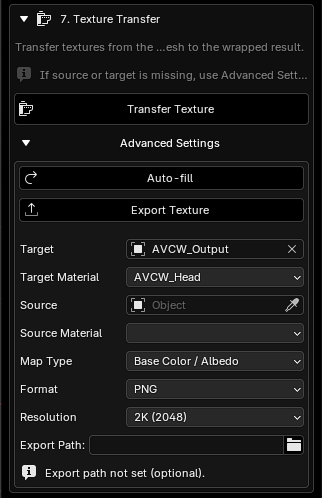
When the Source and Target are detected, choose the transfer mode and then click Transfer Texture. If Transfer All Available Maps is enabled, Avatar Wrap detects the supported maps connected in the Source material and transfers every available Base Color / Albedo, Roughness, Normal, Specular, and Metallic map in one operation, reusing the same texture correspondence instead of remapping the geometry for each map. If the toggle is disabled, only the current Map Type selected in Advanced Settings is transferred. Open Advanced Settings when an object or material is missing, when you need to choose the single Map Type, change resolution/format, or export the generated files.
- Transfer All Available Maps enables batch transfer of every supported texture map that can be resolved from the Source material. Enable it first, then click Transfer Texture. When it is off, Transfer Texture processes only the selected Map Type.
- Auto-fill restores the source, wrapped target, and likely target material from the current Avatar Wrap workflow.
- Target is the wrapped mesh that will receive the new texture.
- Target Material is the material on the wrapped mesh that will receive the result.
- Source is the original external mesh whose texture is being transferred.
- Source Material is the material containing the map to read.
- Map Type selects Base Color / Albedo, Roughness, Normal, Specular, or Metallic for single-map mode. This selection is ignored when Transfer All Available Maps is enabled.
- Format selects PNG or JPEG for exported files.
- Resolution selects 1K, 2K, or 4K output.
- Export Path selects the destination folder. It is optional while transferring inside Blender, but must be set when you want to save the generated image files to disk.
- Export Texture saves the transferred textures to the selected folder. Run Transfer Texture first.
With Transfer All Available Maps enabled, a single Transfer Texture run handles all supported maps found for the current Source material. With the toggle disabled, repeat the transfer only for the individual Map Types you need. Texture Transfer can be used before or after Transfer to AVC, provided the Source mesh and wrapped result are still available in the scene.
Completion Paths
- AVC Preset workflow: choose Head or Full Body, complete steps 1–6, and optionally continue with Transfer to AVC and Texture Transfer.
- MetaHuman Base workflow: choose MetaHuman as the Base, select Head or Full Body, assign the requested MetaHuman meshes, and complete steps 2–6 while preserving the MetaHuman topology.
- Custom Mesh workflow: choose a suitable character Base and the required granular Wrap Type, assign the Custom Mesh areas requested by the panel, complete steps 2–6, and keep the accepted wrapped mesh without requiring Avatar Creator.
- Avatar Creator character: complete steps 1–7.
- Wrapped textures: use step 8 whenever the source mesh and wrapped result are available.
- Complete AVC result: accept the output in step 6, transfer the shape to AVC in step 7, and transfer the required texture maps in step 8.